Transposition of the Script: Bringing Medea to the 1950s

With the play originating in 431 B.C.E, during the Classical Greece period, we were tasked with transposing the script to a more recent era, given the option of a decade of our choice ranging from the 1950s to 1990s. This meant that while the script remained the same, featuring the same lines and events, our depiction of the play was to be set during one of the decades within this range. Due to this, our designs for the play, for example, the set and costumes, were now to take on the appearances of our chosen period, instead of that of 431 B.C.E, which meant that our initial ideas from the Classical Greek era became redundant to the design process of the play. In order to make the play's appearance accurate to our individually selected decades, we were required to perform further research, this time, focusing on our chosen decades.

For this project, I decided to transpose the script to the 1950s. This is due to the similarities between the social structure, in particular, the attitudes towards women, of the Greek culture of 431 B.C.E, when the play made its debut performance. The attitude towards women within the 1950s was primarily around the family structure of that time, with men going out to work and women remaining at home to provide parental care to the children and perform general home maintenance, such as cleaning the laundry. Women of ancient Greece, it would seem, lived a very similar secluded life with the house being viewed as a “prison without bars.” (Durando, 1997:68) This view of life for ancient Greek women would seem to be replicated to a certain extent in the 1950s, which were slightly more lenient, as women would often socialize where possible, which could be used for the group of individuals that make up the Chorus. With this as a guide, it was required of me to research this period further, paying particular attention to items and elements that will greatly effect the design and appearance of the final outcomes for this play.


1950s Research

Houses

In the early 1950s, Britain was just beginning to recover from the destruction caused by the Second World War, during which many houses and homes were destroyed. By the later parts of the decade, the nation had recovered and many houses were constructed similarly to those of Victorian and Edwardian times, commonly with red brick exteriors, but with fewer rooms within. Councils also started to build more estates to house the population. Within these new homes, particularly with young home-owners, came the popular trend of DIY, or 'Do It Yourself'.

01. 1950s 'red brick' house
02. Sketch of 1950s style house


Interior Design

Due to new scientific discoveries, new materials were becoming available to use for furnishing. These materials, such as plastic, plywood and synthetic fabrics, also required and developed new manufacturing techniques, which nowadays are common-place. 

Another key aspect to consider is colour, which was often used in vibrant forms, and utilised to produce various types of pattern. Common types of pattern to emerge were gingham, checks and stripes. Floral patterns were also common.

03. 1950s style interior design
04. 1950s style interior design


Street Parties

Street parties first appeared in 1919, known then as 'Peace Teas', after World War I as a treat for children in those times of hardship, however, they are probably more commonly associated with major royal events, such as jubilees and weddings.

In the 1950s, there were two major national street parties, with one in 1951, known as the Festival of Britain, and the second in 1953, to celebrate the coronation of Queen Elizabeth II.

05. 1950s street party
06. 1950s street party


Fashion & Subculture

Family Households

In the family household of the 1950s, the man was the main provider for his family, going to work, while the wife would look after the child, or children, and do housework. Children would often leave school at an earlier age than todays society, with many starting work at the age of 14.

07. 1950s women's fashion
08. Sketch of 1950s style family

Teddy Boys

Predominantly young men, the Teddy Boy style was created by mixing the more upper-class 'Edwardian' jackets with the American styling and the cowboy's 'maverick' tie. This adoption of the 'Edwardian' jacket was not well received by the British upper-classes, who began to view them as a threat to the status quo. However, the intensified further with the introduction of Rock 'N' Roll. Throughout the '50s, any kid who got into trouble - whatever his style - would be classified as a 'Ted'.

09. 1950s Teddy boys
10. Sketch of 1950s Teddy boy

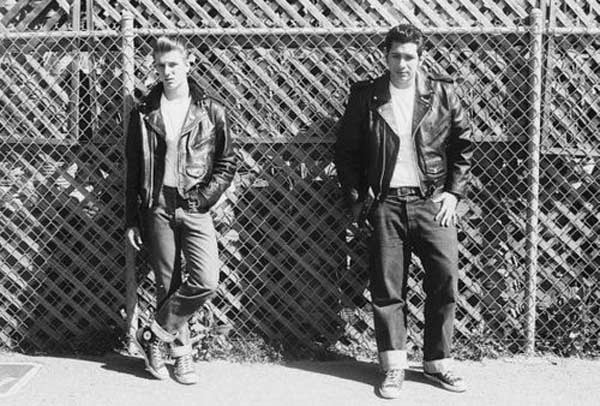
Bikers/Greasers

1950s bikers were considered a rowdy, rebellious group who challenged the new post-war American ideals that appeared. It is stated that many of the individuals were returning veterans from World War II, who found it difficult to adapt from the high adrenaline experience of war into the passive society they returned to, so instead of war to achieve the high levels of adrenaline, they turned to motorcycles.

11. 1950s greasers/bikers
12. Sketch of 1950s biker


Wedding Outfits

The 1950s saw the introduction of the sweetheart neckline, due to Elizabeth Taylor in the film Father of the Bride. Many gowns were designed to be work as strapless evening gowns, for after the wedding, and with a bolero jacket during. Gloves were a standard fashion, but could be fingerless, and usually made of tulle, lace or satin.

The 1950s was a decade defined by decorum, elegance and etiquette.

13. 1950s style wedding dress
14. Sketch of 1950s bride


Bibliography

Durando, Furio (1997). Greece: Splendours of an Ancient Civilization. London, Thames & Hudson.

Costume Design Process

Experimental Phase

As the first step of the costume design process, we were encouraged to experiment with several different methods of mark making and 3D draping tests, which were achieved in several timetabled sessions with one of our course tutors. To achieve these experiments as accurately as possible, we researched and used reference images of Greek clothing from the time period the play was first performed, 431 B.C.E. The first exercise of these sessions involved draping several sheets of material over a mannequin before sketching the resulting shape.

01. Material draped mannequin

03. Sketch of material
02. Sketch of material (close-up)


For the draping process of this exercise we were required to work in small groups to achieve the desired shapes for potential costume designs. Once this was accomplished, with a large selection of media available, we then had to sketch the shapes that were created with the materials, focusing particular attention on the creases and folds that were created from shaping the fabrics. The main point of this task was to gain an understanding of how certain fabrics and their placement on the human form, with the use of a mannequin, result in various folds and creases in specific areas of the body. For this task, we were to attempt to replicate the kinds of outfit styles that were around during the time of the original text and performance of Euripides' Medea.

04. Character costume design sketches
06. Medea and son costume sketches
05. Kreon and Kreusa costume sketches

During another one of these experimental costume design sessions, we were provided with water and several pots of different coloured inks, mostly back and blue/purple. For this experiment, we were to begin developing numerous costume designs for the characters of the play similar to those of the time period. Before focusing on the actual designs for the project, we were instructed by our tutor to experiment the media to discover its strengths and weaknesses and how to effectively use it to create the desired imagery. When it came to designing potential costumes for the play with this method, I quickly drew multiple figure frames for each individual character of the script. With these in position, using the pot of water, I brushed it over the sketches, one character at a time, before using another, smaller brush to both drip and draw the different coloured inks into the water. This would result in the ink spreading (bleeding) in the water, creating the images and, in some cases, providing them with a sense of texture. I repeated this process of brushing water and ink over each individual character frame sketch until all were complete in their desired shape.

Transposition (1950s)

With the original play being first performed in 431 B.C.E, as part of the project, we were required to transpose the original text to a more recent era, ranging from the 1950s-1990s. With numerous similarities to lifestyle in the 1950s, such the view over women's rights, featured within the plays text, and an interest in the cultural styles of that era, I decided to transpose the play from the style of its origin to that of the 1950s. Before beginning to design the final costumes for the characters, I performed further research into the lifestyles and, more importantly for this process, the fashion that was around during this decade.

07. 1950s men's fashion outfit
08. 1950s women's fashion outfit

When it came to researching fashion styles of the 1950s, during a researching workshop session provided by the university library staff, I found several books dedicated to fashion over the decades, with some specializing on the 1950s. Using tracing paper, I sketched several of the photographs of clothing from the era, one for each gender type, before experimenting with different materials in a sketchbook.

For the first experiment, using the tracing paper image as a template, I used several pieces of coloured card to create the shapes of the separate items of clothing that feature within the sketch, in this case, trousers, jacket, and shirt and tie, to recreate the image with a sense of possible colours for the clothing. Once these cut-outs were complete, they were then glued to a page in an A4 sketchbook alongside a copy of the traced image cut from the larger sheet of tracing paper.

09. 1950s pattern fabric swatches

Similar to the previous experiment, once again using an image from the sheet of tracing paper, I replicated the image onto a small piece of patterned fabric. This image on the fabric was later cut-out, into the shape of the dress in the original photograph, and pasted onto a page in my sketchbook. I then painted the areas of the image on the tracing paper, such as the wearers personal features and footwear, before letting it dry. I then cut the image from the tracing paper and stuck it into the sketchbook over the piece of fabric to create the final image. After each of these experimental pieces were complete, I also annotated the images with ideas of who the costumes could be for and how they would best appear.

As the final step of these experiments, I also took several cuttings of fabrics with different patterns that closely resembled the kinds that were common and popular in the 1950s. These were then pasted into the sketchbook to create a sample page for the types of potential patterns that could feature in the final costume designs.

Applying Research to the Designs

Utilizing the research I found on 1950s fashion, I decided to replicate several elements and pieces of clothing from that era as designs for the play's character costumes. To begin with, I decided to use a similar technique as the early experiments, using paint and water, but this time, focusing on creating more accurate imagery. This was achieved by drawing rough outlines of the characters, with a pencil, and painting the clothing over the image to produce a possible design.

11. 1950s Biker & Teddy boy experiments
10. 1950s Style dress experiments

While I originally planned to use this technique for the final costume designs, I found that it was rather time consuming having to wait for the layers of paint to dry. Due to this, I decided to try another method, with media that doesn't take time to dry, speeding up the design process. This reason is why I was unable to complete the potential designs using water and paints, images #10 and #11.

As well as using an alternative media, a series of art pens, I also decided to create the designs in an A4 sketchbook, sketching each character's costume and alternative designs on each page. My main focus of these designs were based around the main characters of the play, Medea, Jason and the boys, with minor attention on the extra characters. These were the final costume experimental images created before designing the final costume appearances.

12. Medea costume designs
13. Jason costume designs

14. The Boys costume designs

15. Nurse costume designs

16. Chorus costume designs

17. Kreon & Kreusa costume designs

18. Aegeus & Attendant costume designs


Euripides & Classical Greece

Fig 01. Sketch of a sculpture of Euripides

Euripides (480-406 B.C.E)


Euripides was the last of the three great tragedians of Classical Greece. Although the majority of his plays have survived as fragments, eighteen have survived in a completed condition.

For the time they were created, his plays seem quite modern when compared to those of his contemporaries. This is mostly due to their portrayal of strong female characters, intelligent slaves, and satirised heroes of Greek mythology. Due to these modernistic qualities, Euripides' work was perceived as controversial by not adhering to the traditions of the audience. This meant that he was never as popular as the other playwrights of the time. This is possibly most apparent in the fact that Medea, first performed in 431 B.C.E, in an Athenian tragedy competition came in last place.

While his plays were not as popular as other playwrights' work at the time of their creation, due to the simplicity of the language used within his plays, by the end of the 4th Century B.C.E they were the most popular. They also had a great influence on many works and genres since, including Roman drama and 17th Century French Classicists, such as Corneille and Racine.

Fig 02. Sketch of a bust of Euripides

Life in Classical Greece


Through their introduction and understanding of science, philosophy, dramatic arts, architecture and democracy, the Ancient Greeks are considered the creators of the western world.

Houses
Fig 03. Sketch of a Classical Greek house

The Ancient Greeks, sometime referred to as Classical Greeks, lived a mostly outdoor lifestyle, performing activities, whether for work or leisure, in the open air, with the house mainly providing shelter at night. For women however, the house was more of a prison without bars.

The houses were constructed using a variety of materials, with the majority using timber framework and pise, or alternatively, plaster finished unbaked bricks on stone foundations. Roofing was mostly flat, with the occasional sloped or twin-sloping for collecting water.

Fig 04. Types of Greek Columns

Architecture

Probably the best example of Classical Greek architecture are the many temples devoted to their gods and goddesses, which regularly comprised of huge columns and carvings of battles from myths.

They believed that the secret to making a great building was the use of mathematics, which they achieved through using the human body for measurements.

There were three main designs of columns used in Classical Greek architecture, Doric (left), Corinthian (centre), and Ionic (right).


The Parthenon

Although the Parthenon appears to have straight edges, it is comprised of strategically placed curves. This means that each piece is uniquely designed for its position in the temple. There is however, no trace of the 40ft gold and ivory statue of Athena that once stood in the great hall through the entrance.

Fig 05. Sketch of The Parthenon

Fig 06. Classical Greek arena theatre

Theatre

The Ancient Greeks loved theatre. The performances were so popular that every town had an arena, which was usually a large bowl-shape built into a hillside, with hard stone seats. An audience, at the time, had the choice of watching three types of play - comedies, tragedy, and satyrs.

There are two main differences between modern plays and those of Classical Greece. Firstly, only male actors were allowed to perform, including all female parts. All performers also had to wear masks, meaning that no faces were seen during the performances. The costumes also consisted of wigs and padding to alter the performers' appearances.

One aspect of the plays that still exists is the chorus, however the role of the chorus nowadays is usually fulfilled by the narrator. The chorus would normally perform below the stage, draped in elaborate costumes. Their role during the performance was to inform the audience of what was going on in the story, most of the time delivering their lines through song and dance.

Fig 07. Sketches of Classical Greek performance masks


Fashion

The main item of clothing at the time was the tunic. These varied greatly depending on the wearer, for example, young men wore short tunics, while older men preferred long ones. Women also wore long tunics, called a chiton, made from a piece of cotton or linen. This was regularly accompanied by a cloak draped from the shoulder, called a himation.

Many people walked around barefoot, but some would wear leather sandals. Due to the discovery of various types of jewellery, such as bracelets, earrings and necklaces, being buried in tombs, it is suggested that such items were commonplace in Ancient Greek culture.

Fig 08. Sketches of types of tunics

Marriage

Marriages were usually arranged with the plan for the woman to be aged between 12-15 years of age and the man being between 25-30 years old on their wedding. These arrangements would sometimes occur several years before the couple reach such ages. The ceremony was traditionally held at the groom's house, with the bride travelling there in a chariot, if they were rich, or a mule cart, if poor. The woman would bring a dowry, which was a gift of something with significant value, and could have been, but not limited to, money, property or even cattle, on the wedding day.

Although this was the case in many parts of Greece, wedding ceremonies were different in Sparta. The bride and groom would engage in a short, friendly physical fight, with the groom winning if they both wished to be married. Afterwards, the groom would toss his wife over his shoulder and carry her off, which would conclude the ceremony. There would then be a feast, in which the guests toasted the new couple.

Divorce, however, was not uncommon in Ancient Greece.

Fig 09. Image of Ancient Greek wedding ceremony


Events around 431 B.C.E


Corinth-Corcyra War (435-431 B.C.E)

Corcyra (now modern day Corfu) was originally established and founded as a colony by Corinth, but due to the taxation and treatment of the colony, by the state of Corinth, the colony sought independence from the state, escalating into a war in 435 B.C.E.

After several years of conflict, Corcyra approached Athens for assistence, who were willing to intervene. The assistance Athens provided to this war is a contributing factor to the outbreak of the Peloponnesian war, between Athens and Sparta.

Fig 10. Map of Classical Greece

Peloponnesian War (431-404 B.C.E)

In 431 B.C.E, the city state of Athens was the greatest power in the Mediterranean, however, tensions had been building between Athens and Sparta for decades, ultimately leading to war between  the two last great city states.

At the outbreak of the war, the Athenians retreated into the city, behind the walls, in order to deny the Spartans the infantry based combat they excelled in. Instead, the Athenians looked towards their navy to supply the city with the provisions needed to succeed in a long drawn-out war. Athens' power came from its naval forces, using amphibious tactics against Sparta in a series of skirmishes and raids.

One year into the war, plague broke-out in Athens, brought back on the shipments of grain. Over one-third of the population would die from this outbreak.

In the year 404 B.C.E, the war would come to an end with Athens' surrender. A great contribution to the Spartan victory was the involvement of the Persian Empire, a great enemy of the Greeks, particularly the to Athens. The Persians provided Sparta with mercenaries and ships, to threaten Athens' domination of the Mediterranean.

The war lasted for almost thirty years, and can be directly attributed to the eventual downfalls of both Athens and Sparta.

Fig 11. Images of a Trireme and Hoplites

Military

The Ancient Greek military was comprised of two main groups, the infantry, known as Hoplites, and the naval force, with their most powerful ships being the Triremes.

The Trireme was developed by the city state of Corinth, and used a combination of speed and manoeuvrability. They were designed to ram into and sink other ships, but also allow infantry to board enemy vessels to fight.

Hoplites would commonly fight in what was known as phalanx formation, which involved interlocking shields and pointing their spears through the gaps.


Fig 12. Sketch of Hoplite infantry in Phalanx formation


Time Management Sheet - Week 04

WEEK (Start from): 27th Nov 2017

TASKS AND ESTIMATE OF TIME REQUIRED PER TASK
Monday: Group production meeting (45mins). Finish miniature bar section of the model box (60mins). Finish painting all sections of the miniature bar area and bar stalls (45mins). Cover all pieces of the model box items in PVA glue (120mins).
Tuesday: Attach last remaining internal mirror section designs to mirror frames (60mins). Piece together model box (45mins).
Wednesday: Photoshop tutorial session (150mins). Cut and glue acetate to mirror sections (45mins). Finished attaching walls to model box (30mins).
Thursday: Sourced materials to build curtain frame (30mins). Build and test curtain frame (30mins). Test bed sheet over curtain frame (10mins). Create last section of set bar top, including painting and varnishing (40mins + drying times).
Friday: Rest day.
Saturday: Practice performance routine (45mins).
Sunday: Rest day.

OUTCOMES:  

What worked?
The PVA covering of the items assisted in the construction of each piece, making it more durable and providing extra strength. It also resulted in a semi-gloss appearance which added to the aesthetic style of the items in the model box.
What didn’t work?
The technique that was going to be utilized to create a dark area behind the mirror areas was ineffective, and wouldn’t produce the required effect. The sheet used, also, wasn’t large enough to cover the frame that was built for it, and allowed too much light through to create a dark enough area.

CONCLUSION:

What have you learned from these processes?
Coating items in PVA adds to their durability, and creates a shiny gloss appearance, which produces an intricate effect that can be used for various items.

How will this help you develop your design?
The versatility means that it can be used for various techniques, which improve both the aesthetic appearances of a piece and how they are constructed. It will help to secure many different materials together with a strong bond.

Did you manage your time well? If not what would you change?
All the construct tasks were completed by the end of the week, meaning that the piece was ready to be transported and performed after tech and dress rehearsals.


Time Management Sheet - Week 03

WEEK (Start from): 20th Nov 2017

TASKS AND ESTIMATE OF TIME REQUIRED PER TASK
Monday: Group Production Meeting (45mins). Improve 1/10th scale bar stalls (90mins). Paint additional layers onto the miniature bar pieces (20mins). Experiment with different materials for the rounded end of the miniature bar (60mins). Sculpt miniature rounded bar end for model box and fire in oven (20mins sculpting, 20mins in oven + 30mins cooling time). Paint first layer on molded sculpey (10mins + drying time).
Tuesday: paint second layer on molded sculpey (10mins + drying time). Cut out wood panels for miniature mirror section of 1/10th scale bar (10mins). Additional layers of paint to miniature bar sections (20mins + drying time). Assist in making miniature chairs for model box (30mins). Paint final base layer on molded sculpey clay 10mins + drying time).
Wednesday: Photoshop tutorial session (150mins). Sketch and paint designs on miniature bar sections (30mins + drying time). Cut and glue bottle shelf sections together (30mins). Paint shelf sections (20mins + drying time).
Thursday: Full performance test runs, re-evaluation and improvements (All day).
Friday: source materials and props for performance (120mins).
Saturday: Finnish writing contextual studies essay (All day).
Sunday: Rest day.

OUTCOMES:  

What worked?
The wood and sculpey segments of the miniature bar dried rather rapidly, allowing multiple layers to be applied in short amounts of time.
What didn’t work?
Attempting to make the sculpey retain it shape was rather complicated, as it would try to resort to a flat shape, rather than the curvature we required.

CONCLUSION:

What have you learned from these processes?
It was rapidly discovered that particular materials can be utilized in various ways, producing differing results, some of which were helpful, but also allowed the realization of their limitations.

How will this help you develop your design?
This creates the understanding that each material should be used in particular ways, and that they each create different results and effects, meaning that when require a particular appearance for an item, there are many ways to achieve the desired effect.

Did you manage your time well? If not what would you change?
A lot of the major aspects of the piece were near completion by  the end of the week, which allowed for experimentation with appearances and techniques which would prove to be highly effective and invaluable for the end result.


Time Management Sheet - Week 02

WEEK (Start from): 13th Nov 2017

TASKS AND ESTIMATE OF TIME REQUIRED PER TASK
Monday: Collected and sourced materials (30mins). Attached supports to mirror frames (30mins). Attached and tested acetate sheets on mirror sections (30mins). Cut out internal mirror designs (45mins). Glue internal mirror designs together (30mins).
Tuesday: Attached balsa wood strips to A1 paper (10mins). Paint balsa wood strips and leave to dry (20mins + Dry time). Experiment with the internal mirror designs and attach gold paper to them (45mins). Test acetate with frame design (20mins).
Wednesday: Source equipment and materials (30mins). Cover balsa wood strips with varnish (15mins). Cut out and attach supports to mirror frames (20mins).
Thursday: Contextual studies group presentation (150mins). Measure and design, before cutting out, miniature bar sections (1/10th scale) for the model box (60 mins).
Friday: Essay writing (All day).
Saturday: Source materials (30mins). Paint front of miniature bar for model box (20mins). Experiment and create five 1/10th scale miniature bar stalls for model box (150mins).
Sunday: Rest day.

OUTCOMES:  

What worked?
Many of the tasks, during the week, were achieved without difficulties occurring. The acetate, used as the mirror’s surface, was highly effective at reflecting the light as well as images of the items placed in front of it.
What didn’t work?
Although the acetate was really reflective, the effect that was created when attempting to pass items through was undesired, as it proved incapable of allowing smooth transitions of the items.

CONCLUSION:

What have you learned from these processes?
It became clear that certain aspects of the project would have to be re-evaluated on occasion and resolved to achieve the fluid and comprehensible effects. Using cameras, with monochrome filters, became invaluable, as they revealed how different the items appeared through a lens, compared to the naked eye.

How will this help you develop your design?
It has forced us to use our cameras, whether on phones or using SLR cameras, in order to discover how the imagery will appear, and if it suits the desired appearances. This has will help us to improve the visual aesthetic of the final piece.

Did you manage your time well? If not what would you change?
Many of the tasks required for the full scale set area were completed during this week, which allowed us to begin focusing our attention on the model box. The early experiments also allowed us to notice any imperfections, or aspects that were unsuited to the piece, which meant we would be able to alter them and resolve the scenarios the ease.